In ApeX Trading Console a trade starts as a zone — a box on the chart with an entry, a stop loss and a take profit. You set your risk, draw the box with the zone button for the direction you want, move its stop and target into place, then send it with Execute. The lot size comes from your risk and the distance to the stop.
The basics, in five steps
Everything below happens on the Trade tab of the panel and on the chart next to it. A demo account is the right place to do this the first time.
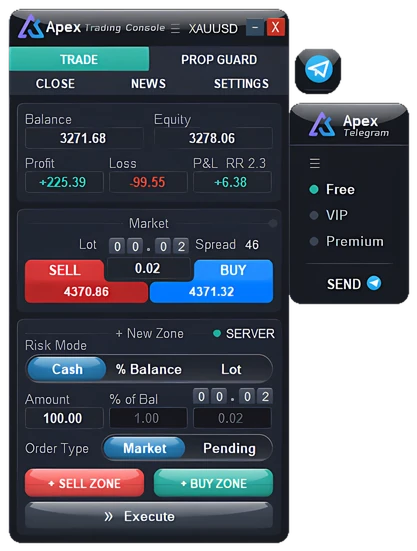
Choose how much to risk
Slide Risk Mode to one of three settings, then fill in the box under it:
- Cash — an amount of money, in Amount.
- % Balance — a share of your balance, in % of Bal.
- Lot — a fixed lot, if you would rather choose it yourself.
Choose Market or Pending
Order Type decides when the trade opens. Market opens it now, at the current price. Pending leaves an order at the entry line and waits for price to come to it.
Draw the zone
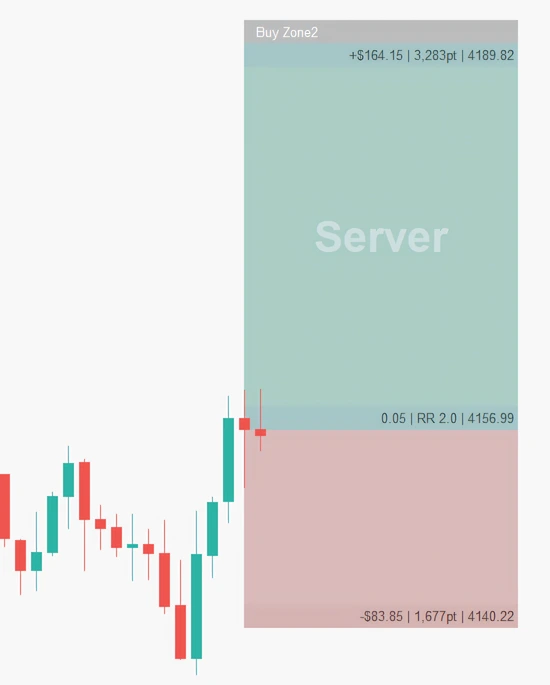
Use + BUY ZONE for a long trade, + SELL ZONE for a short one. A box appears on the chart at the current price, with a stop loss at your usual starting distance and a take profit at your usual reward-to-risk. It is only a draft: nothing has been sent to the broker yet. Press the same button again to remove it.
Drag the stop loss and take profit
Drag the lines to where the trade is wrong and where you want to take profit. For a pending order, drag the entry line too. The box keeps three rows up to date as you move them:
TP profit | points | price
SL loss | points | price
Move the stop further away and the lot gets smaller; move it closer and the lot grows. The money you lose at the stop stays about the same.
Press Execute
A market trade opens straight away with its stop and target attached. A pending order is placed at the entry line — as a limit or a stop order, depending on which side of the current price the line sits. Either way the box stays on the chart as the plan for that trade, and that is where break-even, trailing and the other tools attach later.
An example
You risk 100 dollars on EURUSD, on a US-dollar account. You drag the stop 250 points below the entry. At one lot a point is worth about one dollar, so 250 points is about 250 dollars per lot. The console divides 100 by 250 and opens 0.40 lots: if the stop is hit, you lose about 100 dollars plus costs.
Going further
You do not need any of this for a first trade. Open it when you want to know exactly what the console is doing.
How the lot is worked out, and the defaults behind the box
The lot
The console takes your risk in money — the Cash amount, or that share of your balance — and divides it by what the distance from entry to stop is worth at one lot, using the broker's own figures for the symbol. The result is rounded down to the broker's lot step, so the risk does not creep above what you set.
One exception: the lot can never go below the broker's minimum. If your risk is too small for the distance, the minimum lot is used, and the trade risks more than you asked for. The loss figure on the SL row shows you this before you press Execute.
Where the box starts
In the Settings tab you choose the starting stop distance — a number of points, or a multiple of ATR on the current timeframe — and the starting reward-to-risk that sets the take profit. You can also have the Risk : Reward window open next to the box each time you draw one.
Which pending order you get
A buy with its entry below the current price becomes a Buy Limit; above it, a Buy Stop. A sell with its entry above the current price becomes a Sell Limit; below it, a Sell Stop. You never pick the type yourself — you just put the line where you want in.
Server or virtual stops
The Server / Virtual switch in the card’s header decides whether the stop and target go to the broker with the order, or stay inside the EA. For a first trade, leave it on server. What changes with virtual stops →
The quick BUY and SELL buttons
The BUY and SELL buttons higher up on the Trade tab open a market trade immediately, at the lot shown next to them, with no stop and no target. They skip everything on this page — use them only when you mean to.
If nothing happens when you press Execute
- Algo Trading is off. Turn on the Algo Trading button in MetaTrader's toolbar. The console tells you the order failed and shows the broker's reason.
- Prop Guard has stopped new trades. If you set account limits and they have been reached, or this trade would break them, it will not open. Check the Prop Guard tab.
- There is no draft box. Execute sends the box you drew. Press + BUY ZONE or + SELL ZONE first.
- The broker refused it. A notice starting "Open failed" shows the broker's code and reason — often a stop too close to price or the market being closed.
Questions
Do I have to use a zone to open a trade?
No. The quick BUY and SELL buttons open a market trade at once, but without a stop, a target or a lot worked out from risk. The zone is the way to get all three.
Why is my lot bigger than I expected?
Usually because the stop is close to the entry. A short distance means a bigger lot for the same risk. Check the loss on the SL row: that is what you lose if the stop is hit.
Can I change the stop after the trade is open?
Yes. The box stays on the chart after Execute, and you can drag its lines to move the stop and target of the live trade.
Checked against ApeX Trading Console 6.593.