To connect ApeX Trading Console, the trade manager for MT5, to Telegram: create a bot with @BotFather and copy its token; in MetaTrader add https://api.telegram.org under Tools › Options › Expert Advisors; press the round Telegram button beside the panel and paste the token; put your numeric Telegram user ID in Allowed IDs, which adds your private chat with the bot; press Start in that chat, then Send in the Test column. Groups and channels are added with Find new chats.
Step 1 — Create the bot
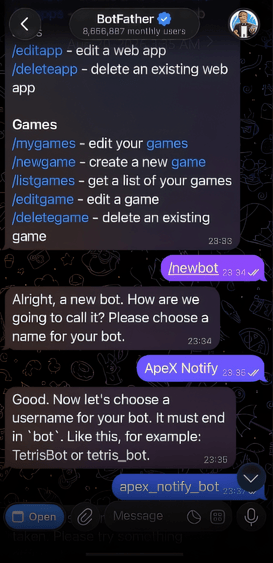
- In Telegram, search for @BotFather — the official one has a blue tick — and open it.
- Send
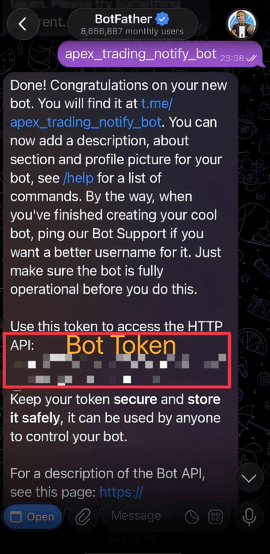
/newbot. Give the bot a display name, then a username that ends in “bot”, for examplemytrades_alerts_bot. - BotFather replies with a token, a long code with a colon in it. Copy it. Anyone who has it can use your bot, so keep it to yourself.
Step 2 — Allow Telegram in MetaTrader
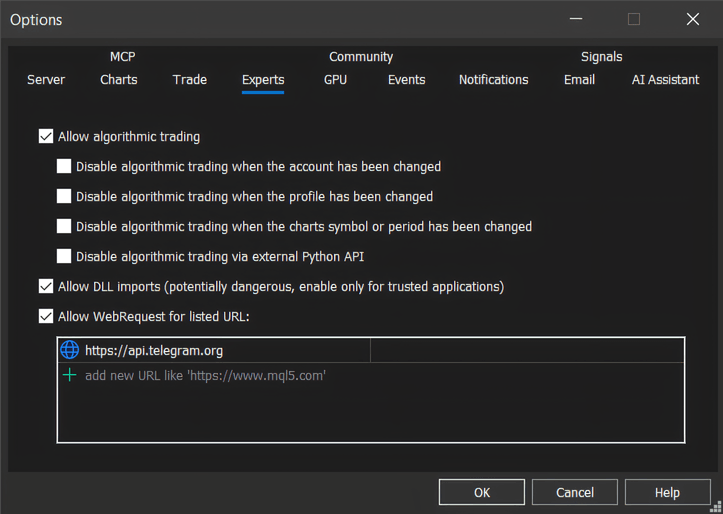
MetaTrader only lets an Expert Advisor reach addresses you have listed. Open Tools › Options and go to the Expert Advisors tab. Switch on the WebRequest option for listed addresses, put https://api.telegram.org in the list below it, and press OK.
Step 3 — Open the Telegram settings and paste the token
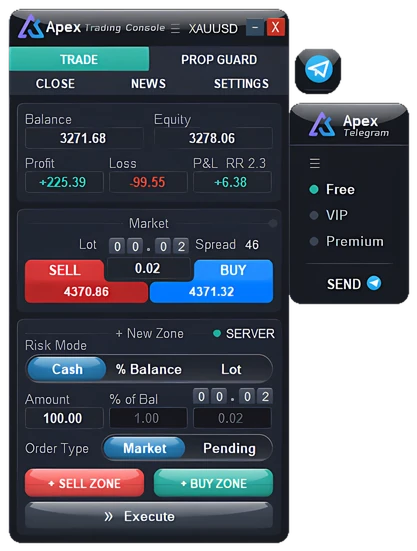
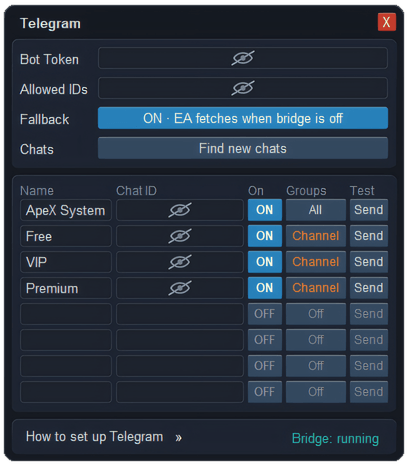
Press the round Telegram button beside the panel. Click the Bot Token box, paste the token and press Enter. Once saved, the token is covered on screen; click the box again when you need to change it.
Step 4 — Put your user ID in Allowed IDs
Allowed IDs is the list of people the bot will listen to. It takes the numeric Telegram user ID, not your @username. The Telegram app does not show this number; the quickest way is to open a lookup bot such as @userinfobot, press Start, and copy the number it replies with.
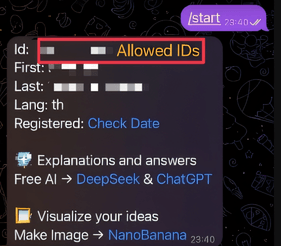
- Paste the number into Allowed IDs and press Enter. For more than one person, separate the numbers with commas.
- A row called ApeX System appears in the chat list. That is your private chat with the bot, set to receive every alert group.
- In Telegram, open your new bot and press Start. Telegram does not let a bot write to anyone who has not started a chat with it first.
An empty Allowed IDs list lets nobody in: alerts still go out, but the bot accepts no commands, and groups you write in are not picked up by Find new chats.
Step 5 — Send a test
On the ApeX System row, press Send in the Test column. Your phone should get “connection test OK” from the bot, and the chart shows “Telegram: sent to ApeX System”. If you see “failed” instead, the number after it tells you why — see If something does not work.
That is the whole basic setup. To choose which events reach Telegram, open Notify & Sound and tick or untick each one there.
Step 6 — Add a group or a channel
Only if you want alerts in a group, or want to post signals to a channel you run. The list holds up to eight chats.
- Add your bot to the group or channel as an administrator.
- Post
/apexin it. - Within five minutes, press Find new chats. Rooms found are listed already ticked; press Add selected.
- Press the new row’s Groups button and choose System for alerts — then pick which alert groups it gets — or Channel for signals you send yourself from the signal bar. Step 7 explains the card.
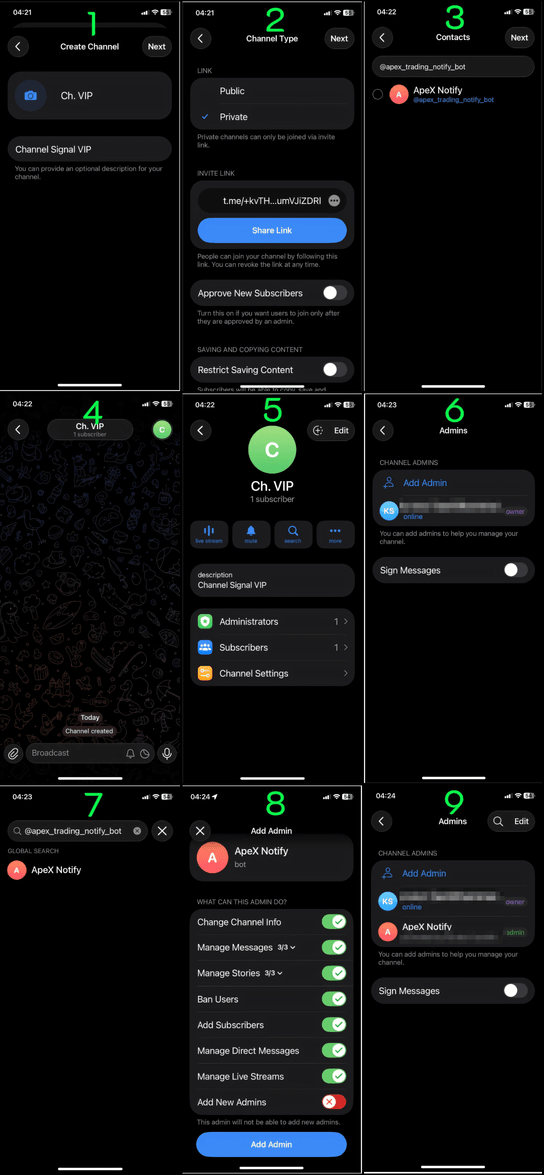
No channel yet? The pictures below go through it in the Telegram app on a phone, numbered in order: 1 name the channel · 2 choose Public or Private · 3 skip adding subscribers · 4 the channel is created · 5 open its info and tap Administrators · 6–7 Add Admin, then search for your bot’s username · 8 leave its rights as they are and tap Add Admin · 9 the bot now shows as admin.
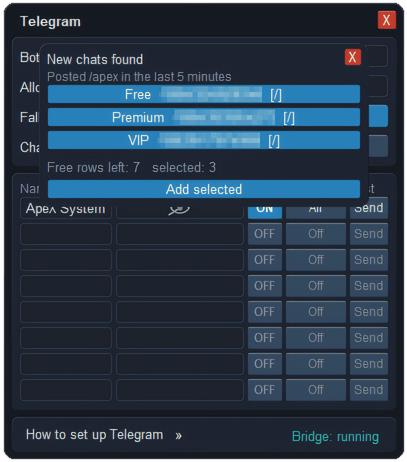
Find new chats does not ask Telegram at the moment you press it. It lists what the console has already received, so something has to be receiving: the Bridge service in step 8, or — without it — a draft zone on the chart with Fallback on, when the console checks for messages every 25 seconds. You can also type a chat ID into an empty row by hand; How to set up Telegram, at the bottom of the window, shows how to find it.
Step 7 — Choose what each chat receives
Every chat in the list has its own Groups card. Open it with the button in that row’s Groups column. For your own chat, that is the ApeX System row — the one created in step 4, whose Chat ID is the same number you typed into Allowed IDs. The number is covered on screen, so go by the name.
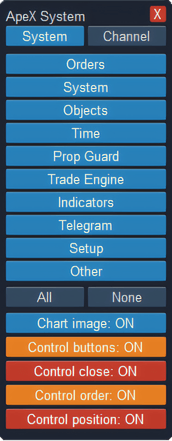
- System or Channel — what kind of room this is. Your own chat must be System: it receives your alerts and, later, can take commands. Channel is for rooms where you post signals from the signal bar; a channel gets nothing else, and parts 2 and 3 disappear from its card.
- Alert groups — blue means this room gets that group, from Orders to Other; All and None switch them in one go. Chart image adds a picture of the chart to trading alerts. Which events belong to each group, and whether an event goes to Telegram at all, is set in Notify & Sound.
- Control — lets this chat send commands and use buttons. It only works with the Bridge service; see step 8.
Step 8 — Commands from your phone (optional)
Alerts and signals work without this. Typed commands and buttons in the chat need the free ApeX Telegram Bridge service, which reads replies around the clock.
- Download ApeX Telegram Bridge from the download page.
- In MetaTrader choose File › Open Data Folder, and copy the file into
MQL5\Services. - In the Navigator, right-click Services and choose Refresh. Right-click ApeXTgBridge, choose Add Service and press OK.
- Back in the Telegram settings, the corner should read Bridge: running.
- Open the Groups card of the ApeX System row (step 7) and switch on what you need in part 3.
| Switch in part 3 | What it allows |
|---|---|
| Control buttons | Makes this chat the control room, the only one that can send commands. There can be just one: turning it on here turns it off in any other chat. It also adds the place, execute and cancel buttons to trade-engine messages. |
| Control close | The close buttons from /close, /closeprofit and /closeloss. |
| Control order | The ✕ that cancels a pending order in /orders. |
| Control position | The ✕ that closes one open position in /positions. |
Control close, order and position all start off. While one is off, the bot answers that command with a note saying which switch to turn on, instead of buttons.
The commands themselves are listed on MT5 and Telegram.
If something does not work
| What you see | What to do |
|---|---|
| Telegram blocked | The address is missing from Tools › Options › Expert Advisors. Add https://api.telegram.org (step 2), then press Send again. |
| failed (HTTP 401) | Telegram rejected the token. Copy it again from BotFather and paste it in full. It is not a ban. |
| failed (HTTP 403) | The bot is not allowed to write to that chat. In your own chat, press Start; in a group or channel, make sure the bot is still an administrator. |
| failed (HTTP 400) | Telegram does not know that chat ID. Check the number in that row, or find the room again with Find new chats. |
| No new chats found | Post /apex again and press Find new chats within five minutes, and make sure something is receiving (step 6). If it says another account is receiving for this bot, only that account can find rooms — one bot is read by one account at a time. |
| Commands get no answer | Check that the corner reads Bridge: running, that you typed in the control room, and that your ID is in Allowed IDs — the Experts log names any ID it turned away. Buttons that do nothing usually mean the matching Control switch is still off. |
Questions
Does my bot token go to ApeX?
No. It stays in MetaTrader on your computer, and messages go from your terminal straight to Telegram.
I have several trading accounts. Do I set this up for each?
Yes. The Telegram settings are kept per trading account, so if you change the bot token, change it in every account that uses it. One bot can send from all of them, but only one account at a time reads the replies.
Do I need the Bridge service for alerts?
No. Alerts, chart pictures and signals to channels are sent by the console itself. The Bridge is only for commands and chat buttons.
Checked against ApeX Trading Console 6.593.